
Uncategorized
How to Sanitize Water Dispensers for Safe Hydration

May
TL;DR:
- Water dispensers are vital but often neglected in regular cleaning routines, allowing biofilm and mold to develop silently. Proper sanitizing, using diluted bleach or EPA-approved solutions, is essential after periods of disuse or contamination, following a step-by-step process that includes pre-cleaning, sanitizing, thorough rinsing, and air drying. Regular maintenance, aligned with filter changes and heightened during boil-water advisories, ensures safe, clean drinking water and prolongs the dispenser’s lifespan.
Your water dispenser is the most-used appliance in your home or office, but it rarely gets the same cleaning attention as the coffee maker or refrigerator. That’s a problem. Studies confirm that moist, enclosed spaces inside water dispensers create the perfect conditions for biofilm (a thin layer of bacteria that sticks to surfaces) and mold to grow silently, even when the water looks and tastes fine. This guide walks you through every step of proper water dispenser sanitation, from gathering supplies to handling emergency scenarios like boil-water advisories, so your water is always as clean as it looks.
Table of Contents
- Why regular sanitizing matters
- What you need: Tools and solutions for safe results
- Step-by-step guide: Cleaning and sanitizing your water dispenser
- Special cases: Boil-water advisories, commercial units, and filter changes
- How often should you sanitize? Frequency and best practices
- Perspective: The hidden value of a clean dispenser — it’s not just about taste
- Upgrade your hydration safety with modern purifiers
- Frequently asked questions
Key Takeaways
| Point | Details |
|---|---|
| Clean, then sanitize | Always clean the dispenser before sanitizing for effective germ control. |
| Use CDC-recommended products | Apply diluted bleach or EPA-registered sanitizers and follow instructions exactly. |
| Consider use frequency | Home and office needs differ—sanitize more often with higher usage or risk. |
| Change filters regularly | Replace filters as part of any sanitation routine or after contamination. |
| Keep records | Set and track a sanitation schedule for peace of mind and health. |
Why regular sanitizing matters
Most people don’t think about their water dispenser until something smells off. By then, the problem has likely been growing for weeks. Biofilm forms when bacteria attach to the inside walls of your dispenser’s reservoir, tubing, and spigots. Once it takes hold, plain rinsing won’t remove it. You need proper sanitizing.
It helps to understand the difference between three terms that people use interchangeably but shouldn’t. Cleaning removes visible dirt and debris with soap and water. Sanitizing reduces bacteria and germs to levels considered safe for human contact. Disinfecting goes further and kills nearly all pathogens, including viruses, and is used in higher-risk situations. As CDC cleaning guidance states, sanitizing reduces germs to safe levels, while disinfecting is stronger and reserved for higher-risk scenarios.
Knowing which approach your situation calls for matters. Here’s a quick breakdown:
When sanitizing is appropriate:
- Routine weekly or monthly maintenance
- After the dispenser has been idle for several days
- When you notice a slightly stale odor
- After swapping a water bottle or changing a filter
When disinfecting is necessary:
- After a confirmed illness in the household or office
- Following a boil-water advisory
- When visible mold or slime is present inside the reservoir
- When someone with a compromised immune system regularly uses the dispenser
For general CDC home sanitizing advice, routine cleaning and sanitizing together keep most residential dispensers safe. Offices that see dozens of daily users face higher contamination risk and should lean toward more frequent sanitizing, potentially weekly rather than monthly. Maintaining purifier efficiency through regular sanitation also extends the life of your entire system.
What you need: Tools and solutions for safe results
Before you start scrubbing, gather everything you need. Running back and forth between the kitchen cabinet and your dispenser wastes time and increases the chance you’ll skip a step. Here’s your complete checklist:
- Rubber or latex gloves
- Unscented household bleach (5 to 8 percent sodium hypochlorite)
- Measuring cup and spoons
- Clean, lint-free cloths or paper towels
- Soft-bristled bottle brush or sponge
- Small bucket or basin
- Mild dish soap for pre-cleaning
- Clean water for rinsing
Once you have your supplies ready, choose the right sanitizing solution. The CDC recommends using a bleach solution or EPA-registered sanitizer, always following the product label carefully. Here’s how common options compare:
| Solution type | Usage | Strengths | Key safety note |
|---|---|---|---|
| Bleach solution (1 tsp per quart of water) | Routine sanitizing | Low cost, widely available | Rinse thoroughly; never mix with other cleaners |
| Ready-made EPA-registered sanitizer | Routine and higher-risk scenarios | Pre-measured, consistent | Check label for food-contact surface approval |
| Disinfectant spray or solution | After illness or advisory events | Kills broad spectrum of pathogens | May require longer contact time; always rinse |
You can find a list of EPA-registered sanitizing products to verify that your chosen product meets recognized safety standards. Always read the full label before using any product on a surface that contacts drinking water. Some products that are fine for countertops are not approved for food or water contact surfaces.
For deeper reference on keeping your filtration system in top shape, the step-by-step filter maintenance guide pairs well with this sanitizing routine.
Pro Tip: Lay all your tools out on a clean towel before you start. It sounds overly simple, but a prepared workspace cuts the total time in half and prevents you from skipping steps because a tool is out of reach.
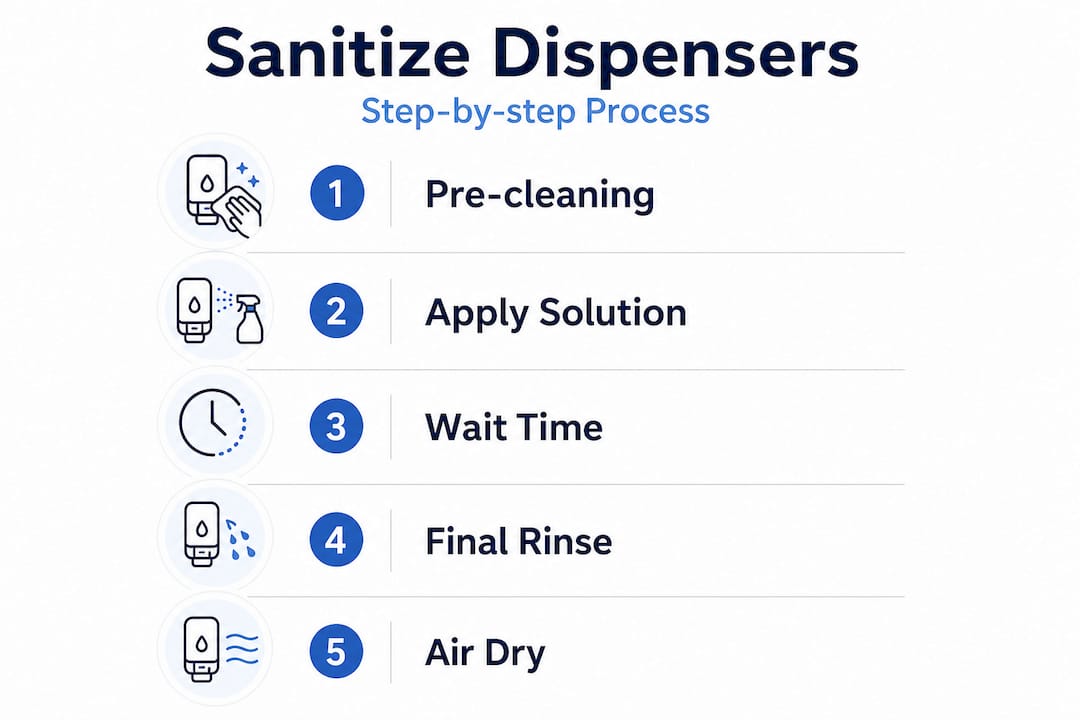
Step-by-step guide: Cleaning and sanitizing your water dispenser
Now that your tools are ready, here’s the full process. Follow each step in order. Skipping ahead, especially rushing past the rinsing phase, can leave chemical residue in your drinking water.
- Unplug the dispenser from the wall outlet before doing anything else. This protects you from electrical shock and lets heating or cooling elements rest safely.
- Remove the water bottle or reservoir and set it aside. Drain any remaining water completely.
- Pre-clean all surfaces with mild dish soap and warm water. Use your bottle brush to scrub the inside of the reservoir, the drip tray, and the spigots. This removes debris, scale (mineral deposits), and loose biofilm.
- Rinse away all soap with clean water. Soap residue can interfere with the sanitizing step.
- Prepare your sanitizing solution. For bleach, mix one teaspoon of unscented bleach per one quart (about one liter) of cool water. Warm water can reduce bleach effectiveness.
- Pour the solution into the reservoir and allow it to fill tubing and internal chambers. Let it soak for at least two minutes, or follow your product label for contact time.
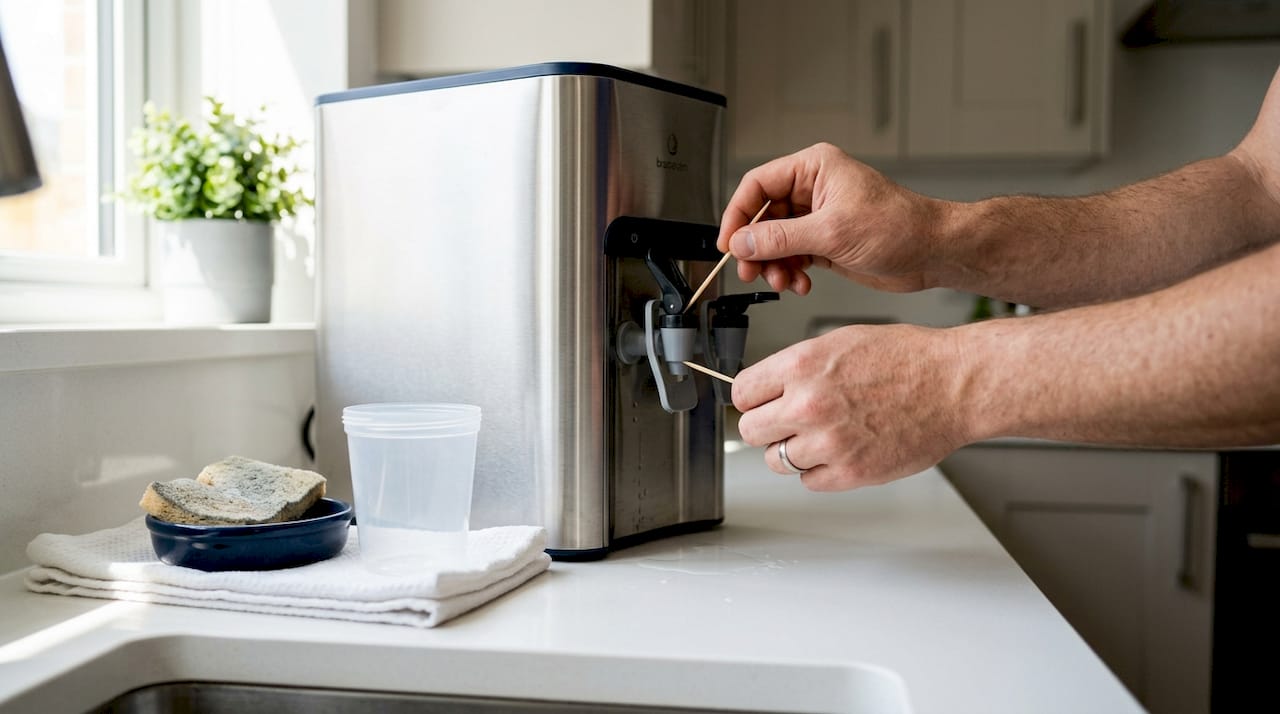
- Scrub all interior surfaces with your brush while the solution is inside. Pay special attention to spigots and the inside of the bottle collar, as these spots collect the most bacteria.
- Drain the solution completely. Open the spigots to let it run through the internal tubing as well.
- Rinse three times with fresh, clean water. Run rinse water through the spigots each time. Three full rinse cycles effectively removes chemical residue.
- Air dry the interior before reassembling. Leave the reservoir open and the spigots open for at least 30 minutes.
Safety note: As CDC food-contact guidance emphasizes, treat your dispenser like a food-contact appliance. Always clean first, then sanitize or disinfect, then rinse thoroughly to remove every trace of chemical solution before the unit contacts drinking water again.
For reference, here’s a quick-reference timing guide:
| Step | Recommended time |
|---|---|
| Pre-cleaning with soap | 5 to 10 minutes |
| Sanitizer contact time (bleach solution) | Minimum 2 minutes |
| Rinse cycles | 3 full cycles, 1 to 2 minutes each |
| Air drying | At least 30 minutes |
Pair this process with the water filter maintenance steps to ensure the entire system is clean at the same time.
Pro Tip: After the final rinse, prop open the spigots with a toothpick or small clip to encourage airflow inside the tubing. This dramatically reduces the chance of mold forming while the unit dries.
Special cases: Boil-water advisories, commercial units, and filter changes
Routine sanitizing handles everyday risks. But certain situations demand a more aggressive response, and knowing the difference can protect your family or your entire office.
After a boil-water advisory, follow these steps in order:
- Stop using the dispenser immediately when the advisory is issued.
- Disconnect the unit from its water source and do not use it until the advisory is lifted.
- Once officials declare the water safe, flush all internal lines by running water through the system for several minutes.
- Complete a full sanitizing cycle using the steps above, but use a disinfecting strength solution for this event.
- Replace all point-of-use filters before resuming normal use.
The boil-water protocol from the CDC is clear: managers should flush, clean, sanitize water-line-connected equipment, and replace all filters when restoring water equipment after an advisory. Skipping even one of those steps leaves your unit vulnerable.
Office and commercial settings have unique challenges worth addressing separately:
- Higher daily use means more frequent contamination from multiple hands touching spigots.
- Commercial units often connect directly to building water lines, which means plumbing issues upstream can affect dispenser safety.
- Shared units in break rooms or lobbies are rarely cleaned unless someone assigns responsibility formally.
- Larger reservoir capacity means water sits longer in some units, increasing biofilm risk.
- Most office managers underestimate how quickly bacterial counts rise in high-traffic dispensers.
Important: Always consult your equipment manual for specific sanitation instructions. The CDC specifically advises that equipment instructions should guide cleaning procedures during contamination events, especially when internal plumbing or filters are involved.
Tie your filter change schedule to your sanitation calendar. Knowing the proper filter replacement timing helps you avoid the common mistake of sanitizing the reservoir while leaving a months-old filter actively contaminating the water downstream. You can also review the full water filter replacement workflow to align both tasks.
How often should you sanitize? Frequency and best practices
One of the most common questions homeowners and office managers ask is: how often is often enough? The honest answer is that it depends on your usage, your environment, and your dispenser type.
For home dispensers, a full sanitizing cycle every four to six weeks is a solid baseline. If the unit is used by young children, elderly family members, or anyone with a health condition that affects their immune system, consider moving to every two to three weeks.
For office dispensers, weekly inspection and monthly sanitizing is a reasonable minimum. High-use offices where the dispenser sees 30 or more users daily should consider a biweekly sanitizing schedule. The important nuance here: daily sanitizing may not be necessary if surfaces and contact points are cleaned carefully after each use.
Watch for these signs that your dispenser needs immediate attention, regardless of your schedule:
- A musty, sour, or off odor from the water or the unit itself
- Visible slime, discoloration, or buildup around spigots or inside the reservoir
- Water that tastes different than usual, even slightly
- A change in water flow rate, which can signal mineral buildup or biofilm blocking lines
- Recent illness in the household or office that could involve waterborne pathogens
Tying your sanitizing schedule to your regular filter replacement schedule makes the whole process easier to remember and ensures both tasks happen in sync.
Pro Tip: Create a simple maintenance log, either a sticky note on the unit or a recurring calendar event, that records the date of each sanitizing session and filter change. Over six months, you’ll have a clear picture of your actual maintenance rhythm and whether it needs adjusting.
Perspective: The hidden value of a clean dispenser — it’s not just about taste
Here’s something most homeowners and even experienced office managers miss: people clean their dispensers reactively, not proactively. They wait for a smell. They wait for a visible sign. By the time either of those appears, the bacterial load inside the unit has often been high for weeks.
The deeper issue is that a neglected dispenser is one of those risks that stays invisible right up until it isn’t. Biofilm doesn’t announce itself. Scale buildup doesn’t taste different on day one. The slow drift from clean to contaminated is gradual, and your senses aren’t calibrated to catch it early enough.
What we’ve observed across residential and commercial settings is that the role of maintenance goes far beyond keeping water tasting fresh. In an office, a consistently maintained dispenser signals something real to your team: that leadership pays attention to the details that affect everyday wellbeing. It’s a visible, daily reminder that health matters here. That signal builds trust, and trust builds morale.
For families, the stakes are equally personal. A sanitized dispenser is one fewer vector for the kind of low-grade illness that keeps kids home from school and adults off their game. The cost of a 20-minute sanitizing session every few weeks is genuinely small compared to the cost of a sick day, a doctor’s visit, or simply weeks of suboptimal hydration because someone avoids the dispenser after noticing a weird taste.
The approach that actually works long-term isn’t the dramatic deep clean once a year. It’s a light-touch cleaning of spigots and drip trays weekly, combined with a full sanitizing cycle monthly. That rhythm keeps contamination from building up enough to become a problem. Less effort, better results, every time.
Upgrade your hydration safety with modern purifiers
Keeping your water dispenser clean is absolutely manageable with the process outlined here. But modern water purifiers take a lot of the guesswork out of it.

Today’s advanced systems are engineered with features that actively reduce contamination risk between cleaning sessions. UV sanitization cycles, for example, run automatically to suppress bacterial growth inside the unit. Smooth internal surfaces resist biofilm adhesion. Sealed reservoirs limit airborne contamination. Understanding the full water purification process helps you see exactly how these features work together to keep your water safe.
If you’re ready to reduce your maintenance burden without compromising water quality, explore the modern countertop dispensers in the Coway lineup. Built for both homes and offices, they combine advanced filtration with designs that make sanitation simpler and faster, so you spend less time cleaning and more time enjoying clean, safe water.
Frequently asked questions
What is the difference between cleaning, sanitizing, and disinfecting a water dispenser?
Cleaning removes visible dirt with soap and water, sanitizing reduces germs to safe levels, and disinfecting is a stronger process that kills nearly all pathogens and is used in higher-risk situations.
How often should a home or office water dispenser be sanitized?
Home dispensers typically need sanitizing every four to six weeks, while office units may need it biweekly or monthly. The CDC notes that daily sanitizing may not be needed if contact surfaces are cleaned carefully after each use.
Which sanitizing products are safe for water dispensers?
Use diluted unscented bleach (one teaspoon per quart of water) or an EPA-registered sanitizing product approved for food-contact surfaces. The CDC recommends following label directions precisely to ensure both safety and effectiveness.
Do filters need to be changed after sanitizing?
Yes, particularly after contamination events or boil-water advisories. The CDC specifies that you should change filters when restoring water equipment after an advisory, and regular filter replacement should align with your overall maintenance schedule.
What should I do if my dispenser was used during a boil-water advisory?
Stop using it immediately, then flush all lines, run a full disinfecting cycle, and replace all point-of-use filters before resuming normal use. The CDC guidance for commercial settings advises flushing, cleaning, sanitizing, and replacing filters as a complete response protocol.
Recommended
- How to Ensure Healthy Drinking Water at Home Easily – Coway Water Purifier
- Cold and hot water dispensers: why they matter at home – Coway Water Purifier
- How to Ensure Safe Drinking Water for Home and Business – Coway Water Purifier
- Why choose contactless water dispensers for health – Coway Water Purifier