
Uncategorized
How to Maintain Home Water Filters for Clean, Safe Water
Nov
Proper water filter maintenance starts long before you ever twist off a single cartridge. In the United States, over 90 percent of households rely on some form of in-home water filtration, yet many overlook the crucial upkeep that keeps water safe. Knowing how to prepare, inspect, clean, and reinstall your system means fewer appliance breakdowns, cleaner drinking water, and peace of mind. This step by step guide breaks down the entire maintenance process, making it clear and manageable for every homeowner.
Table of Contents
- Step 1: Prepare Supplies And Identify Filter Type
- Step 2: Turn Off Water And Release Pressure
- Step 3: Remove And Inspect The Filter Cartridge
- Step 4: Clean Filter Housing And Components
- Step 5: Install New Or Cleaned Filter Properly
- Step 6: Test System And Check For Leaks
Quick Summary
| Key Point | Explanation |
|---|---|
| 1. Gather necessary maintenance supplies | Collect tools like a bucket, replacement cartridges, and cleaning cloths tailored to your filter type for effective maintenance. |
| 2. Securely turn off water supply | Locate and close the main shutoff valve to prevent water flow during maintenance, ensuring safety and minimizing mess. |
| 3. Inspect filter cartridge carefully | Remove and check the cartridge for damage or discoloration to determine if a replacement is needed to maintain water quality. |
| 4. Clean filter housing thoroughly | Use a mild soap solution to clean the interior, preventing contamination and ensuring optimal performance of the filter system. |
| 5. Test system for leaks post-installation | After reinstalling the filter, check for leaks by observing all connections during water flow restoration to ensure a watertight seal. |
Step 1: Prepare Supplies and Identify Filter Type
Before diving into water filter maintenance, you need to gather the right supplies and understand your specific filter type. This critical first step sets the foundation for effective water purification in your home.
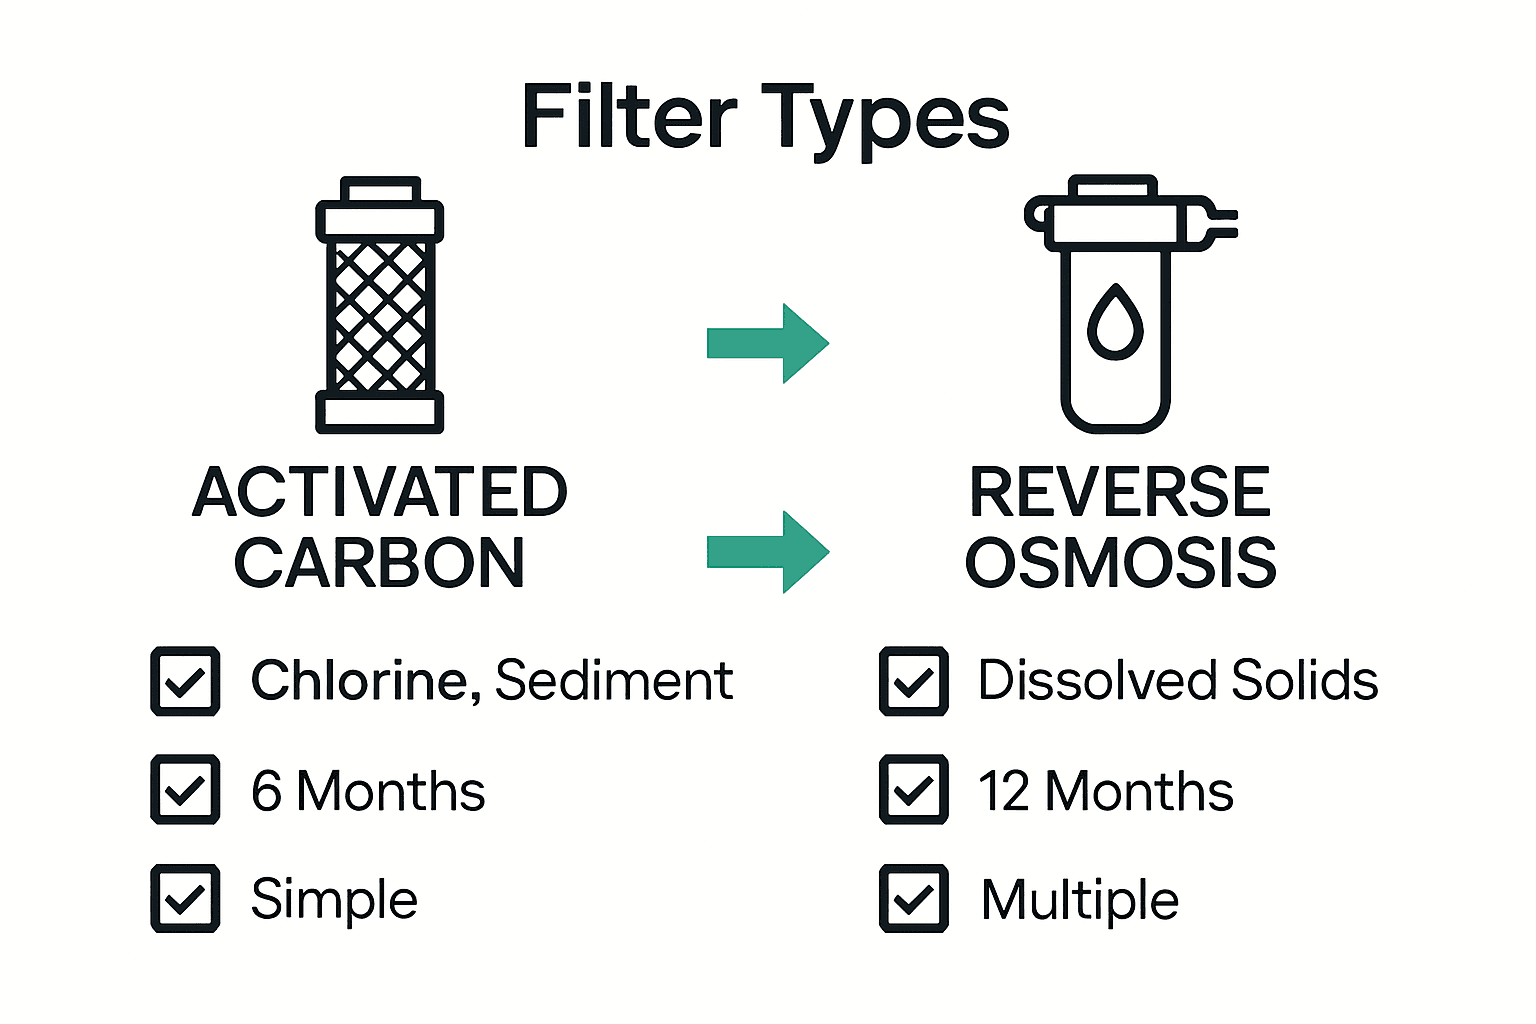
Start by collecting essential tools and supplies like a clean bucket, replacement filter cartridges, gloves, a wrench or pliers specific to your filter model, and cleaning cloths. According to CDC, identifying the exact type of water filter you have is crucial for proper maintenance. Different filtration systems like activated carbon, reverse osmosis, or UV filters require unique approaches to cleaning and replacement.
To determine your filter type, check the manufacturer’s documentation or look for labeling directly on the unit. NSF recommends understanding which specific contaminants your filter targets, as this impacts maintenance procedures. Ceramic filters differ from activated carbon filters in cleaning requirements, so precision matters.
 Pro tip: Take a photo of your current filter setup before removal to help with reinstallation and reference future maintenance needs.
With your supplies gathered and filter type identified, you are now prepared to move forward with the detailed maintenance process that will ensure clean, safe drinking water for your household.
Step 2: Turn Off Water and Release Pressure
Now that you have your supplies ready and have identified your filter type, it is time to safely prepare your water filter system for maintenance by turning off the water supply and releasing internal pressure. This critical step prevents potential water damage and ensures your safety during the maintenance process.
Locate the main water shutoff valve for your home typically found near the water meter or where the main water line enters your house. Turn the valve clockwise until it is completely closed to stop water flow to your filter system. EPA recommends maintaining proper water pressure, which means carefully managing how you interrupt and restore water flow during maintenance. Next, open the filter system’s release valve or a nearby faucet to drain any remaining water and equalize the internal pressure. This step prevents sudden water surges and reduces the risk of unexpected spraying when you begin disassembling the filter.
Warning: Always wear protective gloves and have a towel or bucket nearby to catch any residual water. Some water filter systems might have specific pressure release mechanisms, so consult your manufacturer’s manual for precise instructions. Once pressure is released, you are ready to proceed with filter removal and cleaning with minimal risk of water spillage or system damage.
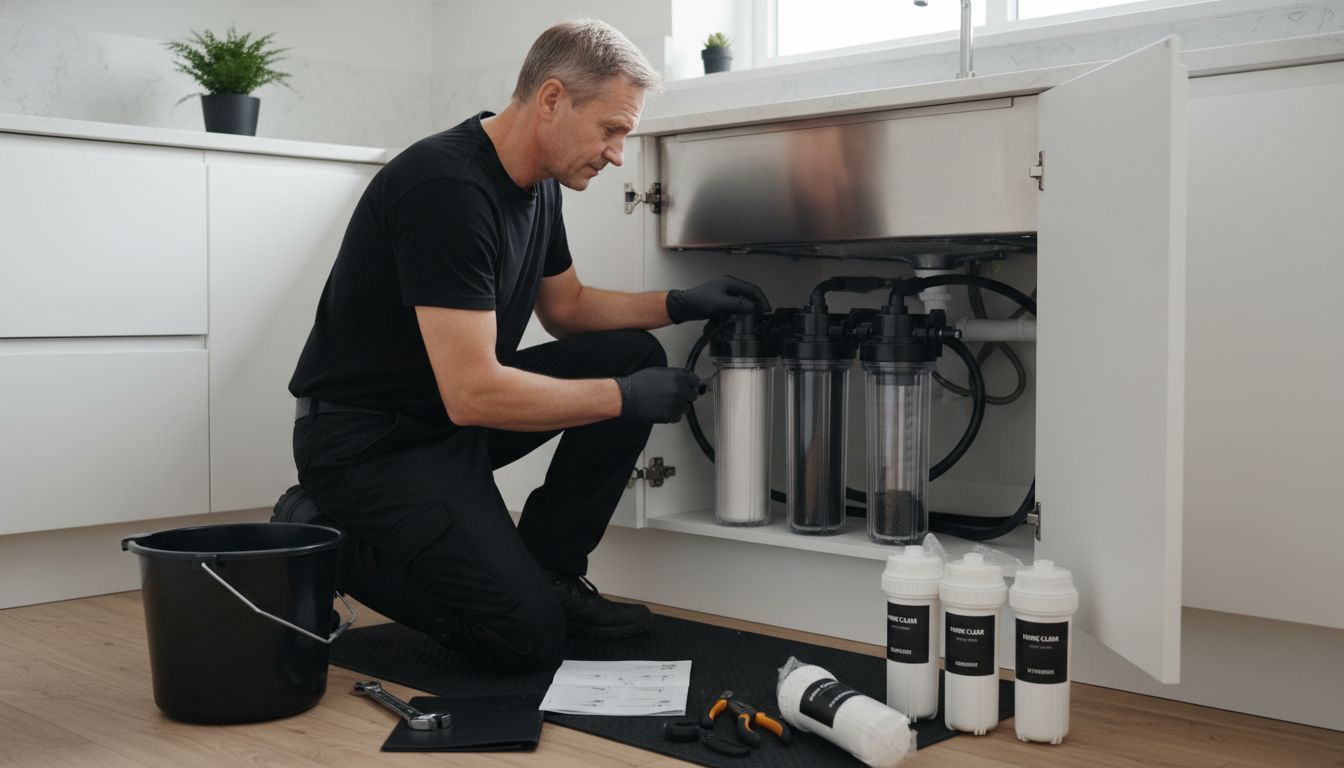
Step 3: Remove and Inspect the Filter Cartridge
With the water supply shut off and pressure released, you are now ready to carefully remove and thoroughly inspect your water filter cartridge. This crucial step helps you identify potential wear, damage, or contamination that might compromise your water quality.
Drinking-Water.org emphasizes the importance of following careful removal procedures to prevent damage to your filtration system. Begin by slowly and gently unscrewing the filter housing using the wrench or pliers you prepared earlier. If the cartridge seems stuck, avoid using excessive force that could crack the housing or break the filter. Instead, try rotating the cartridge with steady, even pressure while supporting the housing to prevent strain.
Once removed, NSF recommends conducting a thorough visual inspection of the cartridge.
Look for signs of discoloration, sediment buildup, unusual odors, or physical deterioration such as cracks or warping. These indicators suggest it might be time for a replacement. Pro tip: Always compare the condition of the current cartridge with the manufacturer’s recommended replacement guidelines. Some filters show subtle signs of wear before complete failure, so a careful examination can help you preemptively address potential water quality issues. With the cartridge inspected, you are now ready to proceed to the cleaning or replacement stage of your maintenance routine.
Step 4: Clean Filter Housing and Components
Now that you have removed the filter cartridge, it is time to thoroughly clean the filter housing and associated components. This step is critical for maintaining water quality and ensuring your filtration system operates at peak efficiency.
NSF advises that regular maintenance of filter housings prevents potential contamination and system degradation. Begin by preparing a mild cleaning solution using warm water and a small amount of unscented dish soap. Avoid using harsh chemicals or abrasive cleaners that could damage the housing or leave harmful residues. Carefully clean the interior of the housing using a soft cloth or sponge, paying special attention to removing any sediment buildup or mineral deposits. Drinking-Water.org emphasizes the importance of gentle but thorough cleaning to prevent future filter complications.
Warning: Rinse the housing completely with clean water to remove all soap residue before reassembly. Any leftover soap can potentially contaminate your water supply or interfere with the new filter’s performance. After cleaning, inspect the housing for any cracks, wear, or damage that might compromise its integrity. With the guide on water filter maintenance, you are now ready to proceed with reassembling your water filtration system and restoring your water supply.
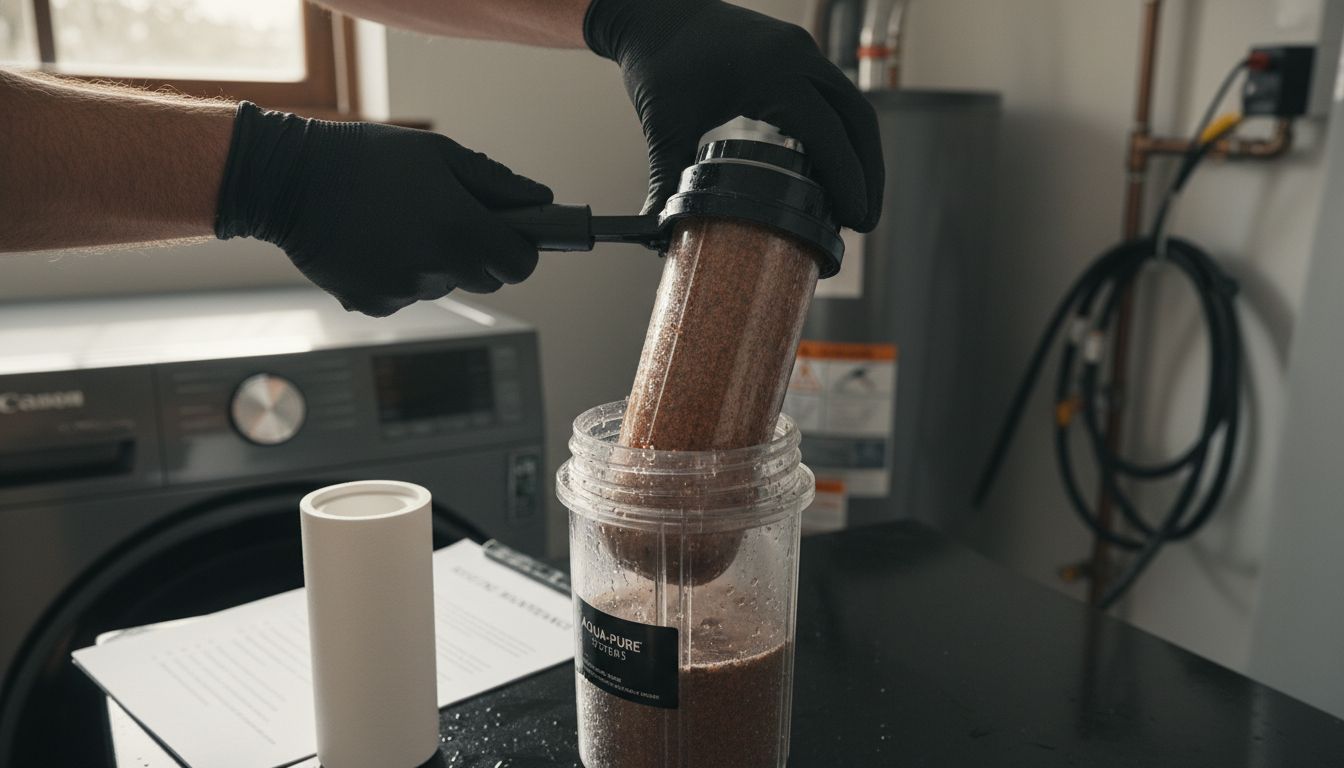
Step 5: Install New or Cleaned Filter Properly
With your filter housing cleaned and your new or cleaned filter cartridge ready, you are now prepared to reinstall the critical component of your water filtration system. This step requires precision and careful attention to ensure your water remains clean and safe.
NSF recommends carefully following manufacturer instructions during installation. Begin by checking the new filter cartridge for any protective packaging or seals that need removal. Apply a thin layer of food grade silicone lubricant to the filter’s rubber sealing ring to ensure a watertight connection and prevent potential leaks. Gently insert the filter cartridge into the housing, making sure it is seated correctly and aligned precisely with the housing grooves. Drinking-Water.org emphasizes the importance of avoiding forceful installation that could damage the delicate components.
Warning: Hand tighten the filter housing securely but do not over tighten, which could crack the housing or damage the seal. After installation, consult our water filter replacement workflow to ensure you complete the final steps of recommissioning your water filtration system. You are now ready to restore water flow and enjoy clean, filtered water once again.
Step 6: Test System and Check for Leaks
After reinstalling your water filter, the final crucial step is to thoroughly test the system and carefully inspect for any potential leaks. This verification process ensures the integrity of your water filtration system and prevents potential water damage or contamination.
EPA recommends systematically checking water pressure and leak points during system maintenance. Slowly turn on the main water supply valve and observe the filter housing and connections for any signs of water seepage or dripping. Run water through the system for several minutes, watching closely for moisture around seals, connections, and the housing itself. Pay special attention to joint areas and the base of the filter system where leaks most commonly occur.
Warning: If you notice even a small amount of water leakage, immediately turn off the water supply and carefully recheck the filter installation. Ensure the sealing ring is properly positioned and the housing is not cross threaded or damaged. You might need to slightly adjust the filter or replace the sealing ring to create a perfect watertight seal. For additional guidance on maintaining a robust water filtration system, review our water filter replacement workflow to confirm you have completed all necessary steps. Your diligence now will help ensure clean, safe water for your household.
Keep Your Water Pure with Reliable Filtration Solutions
Maintaining your home water filter can be challenging when faced with issues like clogged cartridges, leaks, or unclear cleaning steps. This article highlights important steps such as identifying your filter type, safely turning off water pressure, and inspecting cartridges to ensure your water stays clean and safe. If you want to avoid the hassle of frequent maintenance and ensure advanced filtration with ease, explore trusted water purifiers designed for your needs.

Discover the peace of mind that comes with Coway’s innovative water purifiers featuring advanced filtration technology and UV sanitization. Visit our Uncategorized Archives – Coway Water Purifier to browse models that fit your home and lifestyle. Act now to take advantage of free delivery and installation and enjoy healthy, worry-free water every day. Start your journey toward safer drinking water today at https://cowayswaterpurifier.com.
Frequently Asked Questions
How often should I maintain my home water filters for clean, safe water?
To ensure optimal performance, you should maintain your home water filters every 6 months. This includes replacing cartridges and cleaning the filter housing to prevent contamination.
What supplies do I need to prepare for maintaining my water filter?
Gather essential supplies such as a clean bucket, replacement filter cartridges, gloves, a wrench or pliers, and cleaning cloths. Having everything ready will streamline the process and ensure you have what you need at each step.
How can I tell if my water filter cartridge needs to be replaced?
Inspect your cartridge for signs of discoloration, sediment build-up, or cracks. If you notice any of these issues, replace the cartridge to maintain water quality and avoid potential contamination.
What steps should I take to clean the filter housing?
To clean the filter housing, create a mild solution of warm water and unscented dish soap. Use a soft cloth or sponge to gently scrub the interior and then rinse thoroughly to remove all soap residues before reassembly.
How do I test my water filter system after maintenance?
After reinstalling your filter, slowly turn on the main water supply and check for leaks around the housing and connections. Run water through the system for a few minutes and observe for any moisture, ensuring everything is sealed properly.
What should I do if I find a leak after maintenance?
If you detect a leak, immediately turn off the water supply and check the installation of the filter. Adjust the filter position or replace the sealing ring as needed to ensure a watertight connection before turning the water back on.
Recommended
- Step by Step Water Filter Maintenance for Clean Results – Coway Water Purifier
- Water Filter Replacement Workflow for Safe Drinking Water – Coway Water Purifier
- 7 Essential Steps for Your Purifier Maintenance Checklist – Coway Water Purifier
- 7 Essential Types of Water Filters for Every Home – Coway Water Purifier