
Uncategorized
Water Filter Troubleshooting Guide for Fast, Clear Results
Nov
A single blocked filter or loose connection can leave your home without clean water for hours. Water filter troubles happen to almost every household, but quick checks can often prevent bigger problems. Understanding the right troubleshooting steps gives you reliable water and saves time. This guide will help you clear up common issues, improve your system’s performance, and keep your water tasting fresh.
Table of Contents
- Step 1: Prepare by Checking Power and Water Supply
- Step 2: Inspect Filter Connections and Seals
- Step 3: Clean or Replace Blocked Filter Components
- Step 4: Reset and Recalibrate Your Water Filter System
- Step 5: Verify Water Quality and Restore Normal Operation
Quick Summary
| Key Point | Explanation |
|---|---|
| 1. Verify power and water supply | Confirm the electrical connection and ensure the water source is turned on and unobstructed to prevent troubleshooting delays. |
| 2. Inspect filter connections and seals | Conduct a thorough check for wear, leaks, or sediment buildup around connections and seals to maintain system integrity. |
| 3. Clean or replace blocked filter components | Regularly clean or replace filters that are dirty or past their recommended usage to keep filtration efficient. |
| 4. Reset and recalibrate your system | After maintenance, unplug and clean the unit before following specific reset instructions to restore optimal functionality. |
| 5. Verify water quality after troubleshooting | Test water clarity, taste, and parameters like TDS and pH to ensure your system is functioning effectively again. |
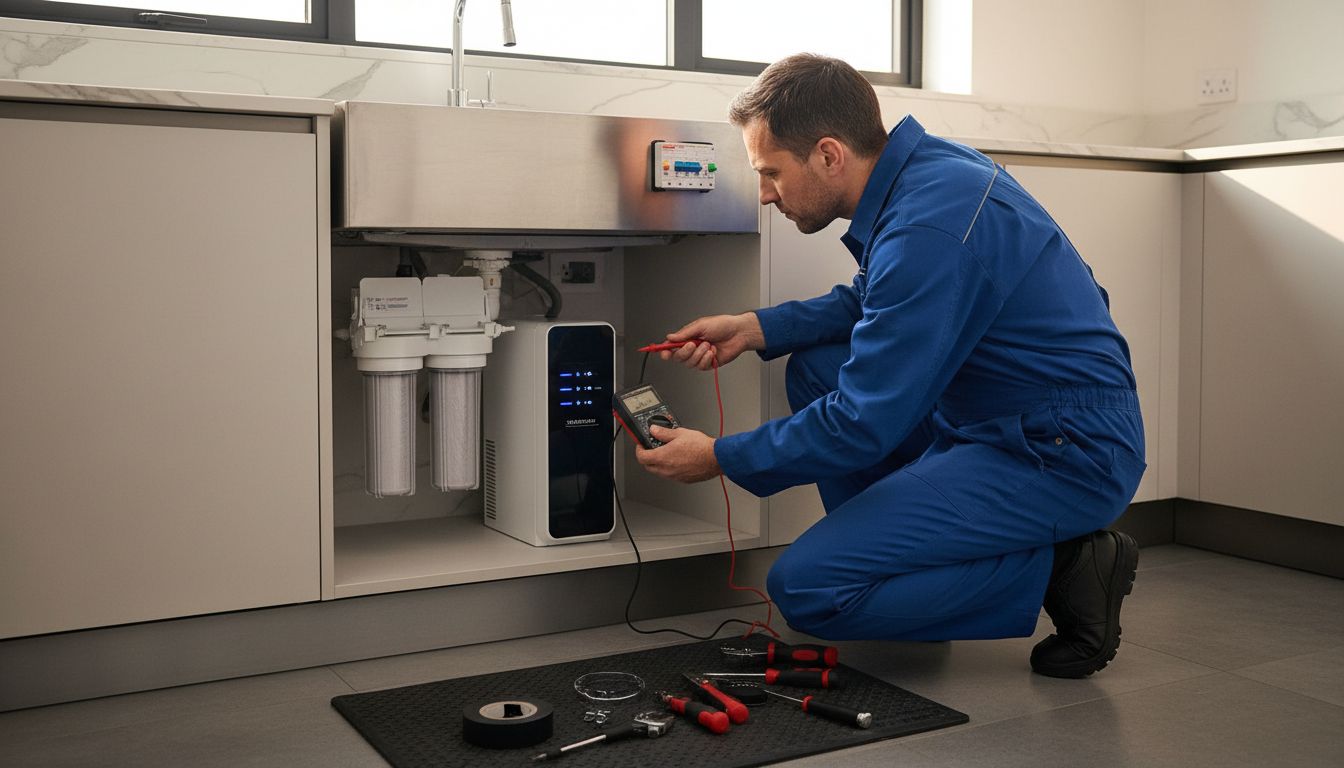
Step 1: Prepare by Checking Power and Water Supply
Before diving into water filter troubleshooting, you’ll want to verify two critical systems power and water supply. Think of this as your diagnostic starting line a simple but crucial first step that can save you hours of frustration.
First, check your electrical connection. According to Smith University Science, it’s essential to ensure your power source is functioning correctly. Locate your electrical outlet or circuit breaker and confirm steady voltage. As a pro tip from ESSC India, inspect the Miniature Circuit Breaker (MCB) to guarantee proper electrical current flow. A faulty MCB can completely interrupt your system’s power.
Next, verify your water supply. Trace your filter’s water inlet and make absolutely certain the water source is turned on and unobstructed. Check for any visible blockages or kinks in the water line that might restrict flow. Confirm water pressure seems consistent and strong. If you notice weak or inconsistent water flow, you might need to investigate further or potentially replace pump filters.
With power and water supply confirmed, you’re now ready to move forward in your water filter troubleshooting journey. Your next step will involve a more detailed system diagnostic.
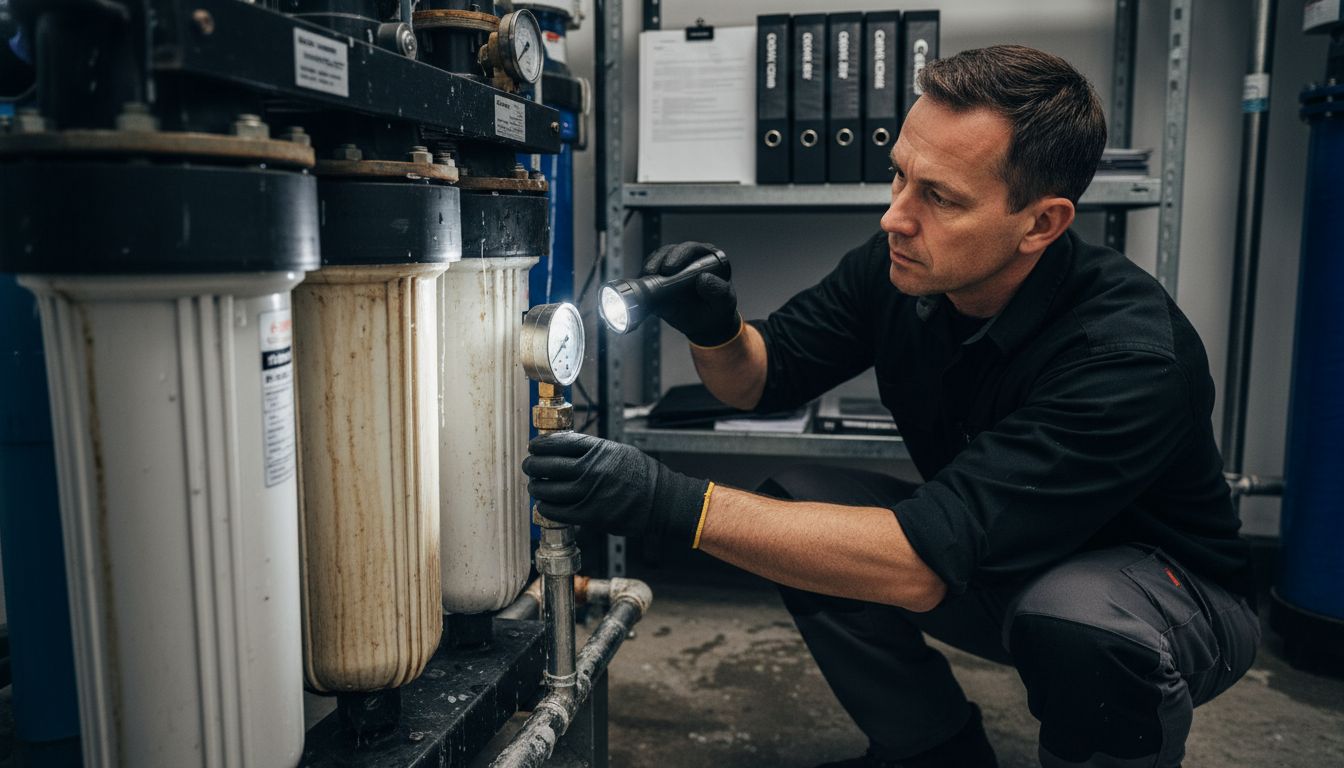
Step 2: Inspect Filter Connections and Seals
With power and water supply confirmed, your next critical step is carefully inspecting all filter connections and seals. This crucial diagnostic phase helps prevent leaks, ensure proper filtration, and catch potential issues before they become major problems.
According to ESSC India, you should unplug the unit and conduct a thorough physical inspection following the manufacturer’s manual. Start by examining each connection point carefully. Look for signs of wear such as cracking, discoloration, or mineral buildup around seal areas. Gently wiggle connections to check for any looseness that might indicate potential leakage points.
As recommended by the EPA, pay special attention to pressure and potential filter fouling. Check for any sediment or unusual buildup inside the filter vessel. If you notice significant sediment or detect unusual pressure downstream, you may need to replace the filter element. A good rule of thumb is to replace filters at the first sign of performance decline or visible contamination.
Once you have thoroughly inspected and confirmed the integrity of your connections and seals, you are ready to proceed to the next phase of water filter troubleshooting.
Step 3: Clean or Replace Blocked Filter Components
Now that you have inspected your filter connections, it is time to address any blocked or compromised filter components. This critical step ensures your water filtration system continues to deliver clean, safe drinking water at peak performance.
According to IERE, regular filter replacement is crucial to prevent excessive clogging and maintain optimal filtration efficiency. Begin by carefully removing the existing filter according to your manufacturer’s instructions. Examine the filter for signs of heavy sediment, discoloration, or mineral buildup. If the filter appears significantly dirty or has been in use beyond the recommended timeframe, replacement is your best option.
For filters that might benefit from cleaning, At Home Medical recommends using a mild detergent and warm water. Gently rinse the filter with cool water and allow it to air dry completely before reinstallation. Pro tip: Never reinstall a damp filter, as moisture can promote bacterial growth. Ensure the filter and surrounding components are absolutely dry before reassembling your system.
With clean or replaced filter components, you are now ready to move forward in restoring your water filter’s optimal performance. Your next step will involve testing the system to confirm proper functionality.
Step 4: Reset and Recalibrate Your Water Filter System
After cleaning and replacing filter components, resetting and recalibrating your water filter system is crucial for restoring optimal performance. This step ensures your system returns to its baseline functioning and eliminates any potential lingering issues from previous troubleshooting efforts.
According to Smith University Science, the first critical action is to unplug the control unit from the wall outlet before beginning any reset process. If your system displays a fault message, this step becomes even more important. After unplugging, take a clean disinfectant solution and thoroughly wipe down the entire control unit and associated hoses. Allow the disinfectant to sit for approximately 10 minutes to ensure complete sanitization.
Once you have cleaned the system, carefully dry all components using a disposable cleaning cloth or sponge. Reconnect the unit and refer to your manufacturer’s specific reset instructions these can vary significantly between different water filter models. Some systems require pressing a specific combination of buttons, while others might need a complete power cycle. If you are unsure about the exact reset procedure, consult your user manual or contact the manufacturer’s customer support for precise guidance.
With your system reset and recalibrated, you are now ready to test its performance and ensure everything is functioning correctly. The final step will involve running a comprehensive system check to confirm all components are working as expected.
Step 5: Verify Water Quality and Restore Normal Operation
With your water filter system reset and recalibrated, the final step is verifying water quality and ensuring your system returns to its optimal performance. This critical phase confirms that all previous troubleshooting efforts have successfully resolved any underlying issues.
According to Portland Water Bureau, maintaining water quality requires careful attention to several key factors. Start by checking your faucet aerator screens and cleaning them thoroughly. Run a test sample of water and observe its clarity, taste, and odor. Pay special attention to any changes from your system’s baseline performance.
As recommended by Water Care Services, consider using smart sensors or testing devices to monitor critical water parameters like Total Dissolved Solids (TDS), pH levels, and overall water flow. These measurements provide precise insights into your water filter’s functioning.
![]() If any readings appear abnormal, double check your system components or consider consulting a professional water quality technician. Pro tip: Keep a log of your water quality tests to track performance and identify any recurring issues quickly.
If any readings appear abnormal, double check your system components or consider consulting a professional water quality technician. Pro tip: Keep a log of your water quality tests to track performance and identify any recurring issues quickly.
With water quality verified and your system functioning normally, you have successfully completed the comprehensive water filter troubleshooting process. Regular maintenance and proactive monitoring will help ensure consistent, clean water for your home.
Take Control of Your Water Quality with Trusted Filtration Solutions
If you have ever struggled with inconsistent water flow or worried about filter blockages, you know how frustrating it can be to maintain clear, safe water at home. This guide to water filter troubleshooting highlights key challenges like checking power and water supply, inspecting seals, and cleaning or replacing filters to keep your system running smoothly. Don’t let minor issues turn into major headaches. With advanced filtration technology and reliable support, you can protect your family’s health and enjoy peace of mind every day.

Explore the wide range of innovative water purifiers designed to simplify maintenance and maximize water quality at Uncategorized Archives – Coway Water Purifier. Act now and take advantage of free delivery, professional installation, and comprehensive service options available only at https://cowayswaterpurifier.com. Your next step is simple: discover the perfect system that fits your home and start experiencing clean water without the hassle today.
Frequently Asked Questions
How do I check the power supply for my water filter?
To check the power supply, locate the electrical outlet or circuit breaker connected to your filter. Confirm that it is functioning correctly and that the Miniature Circuit Breaker (MCB) is not faulty.
What steps should I take if my water supply seems blocked?
Inspect the water inlet for any visible blockages or kinks in the water line. Ensure that the water source is turned on and that water pressure appears consistent and strong.
How can I tell if my filter connections and seals are damaged?
Look for signs of wear around each connection point, such as cracking or mineral buildup. Wiggle the connections gently to check for looseness, which might indicate potential leakage points.
What should I do if my filter is clogged or dirty?
Remove the existing filter following the manufacturer’s instructions and inspect it for heavy sediment or discoloration. If it appears significantly dirty, replace it; otherwise, you can try cleaning it with mild detergent and allowing it to dry completely before reinstalling.
How do I reset and recalibrate my water filter?
Unplug the control unit and clean it with a disinfectant solution. After drying all components, reconnect the unit and follow the manufacturer’s specific reset instructions, which may include pressing a combination of buttons or simply restoring power.
How can I test the water quality after troubleshooting my filter?
Run a test sample of water from your faucet and observe its clarity, taste, and odor. Use smart sensors or testing devices to monitor critical parameters like Total Dissolved Solids (TDS) to ensure the filter is functioning correctly.
Recommended
- Water Filter Replacement Workflow for Safe Drinking Water – Coway Water Purifier
- 7 Essential Types of Water Filters for Every Home – Coway Water Purifier
- How to Install Water Filter: Step-by-Step Home Guide – Coway Water Purifier
- Complete Guide to Why Choose Under-Sink Purifiers – Coway Water Purifier