
Uncategorized
Step by Step Water Filtration Setup for Safe Drinking
Jan
Nearly 45 million American households rely on water sources that may contain hidden contaminants. For any health-focused homeowner, keeping your family safe often starts right at the faucet. Choosing, installing, and fine-tuning an effective water filtration system can seem complicated, but step-by-step guidance makes the process clear and manageable. This approach helps you confidently protect your American household from common water quality threats with practical solutions you can trust.
Table of Contents
- Step 1: Gather Necessary Tools And Select Your Filtration System
- Step 2: Install Main Filtration Unit And Connect Water Lines
- Step 3: Attach Essential Filters And Secure Housing
- Step 4: Flush System And Check For Leaks
- Step 5: Test Water Quality And Confirm Safe Operation
Quick Overview
| Main Insight | Explanation |
|---|---|
| 1. Test Water Quality First | Conduct comprehensive water tests to identify contaminants before selecting a filtration system. |
| 2. Choose Right Filtration Type | Match your filtration system to your water source and types of contaminants for maximum efficacy. |
| 3. Ensure Proper Installation | Follow careful installation procedures to avoid leaks and guarantee the system functions optimally. |
| 4. Perform Regular Maintenance | Retest water quality annually to ensure continued effectiveness of your filtration system. |
| 5. Log Test Results Over Time | Keep a detailed record of your water quality tests to monitor changes and maintain safe drinking water. |
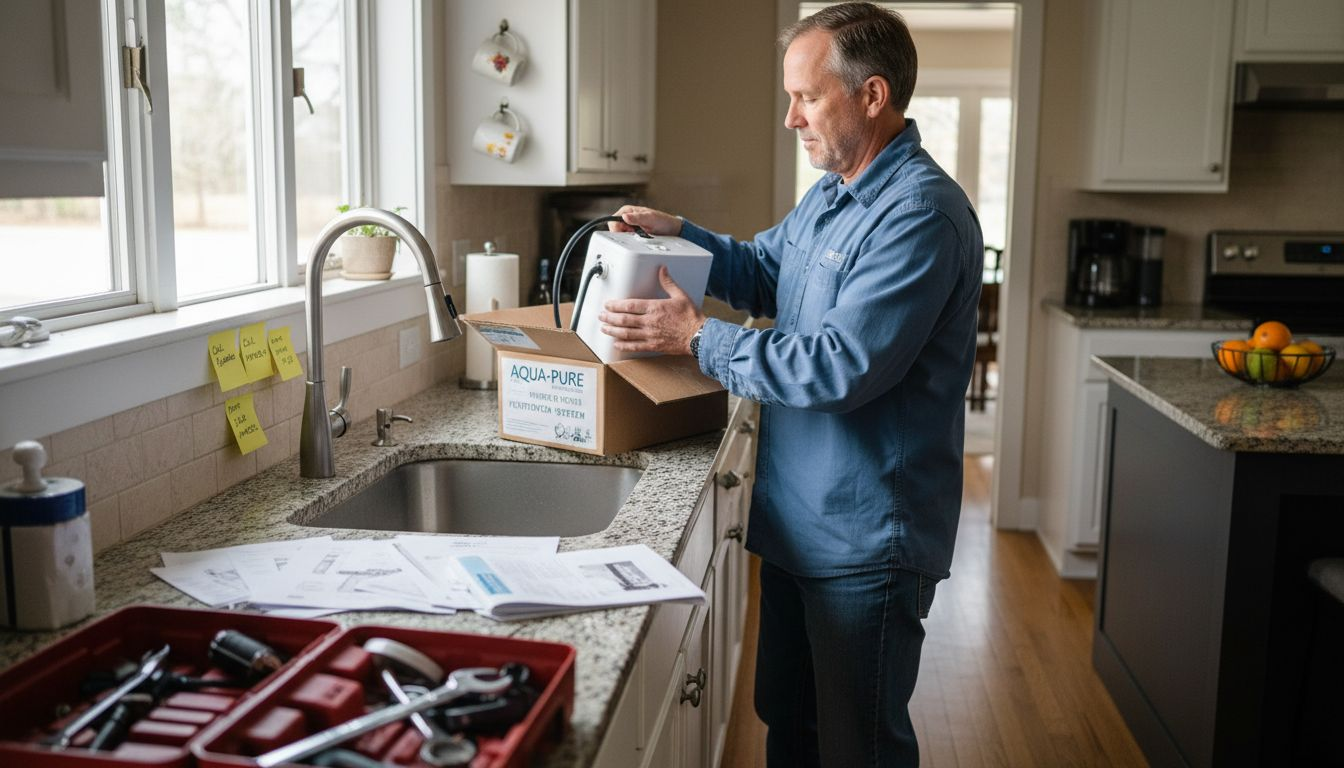
Step 1: Gather necessary tools and select your filtration system
Before diving into water filtration, understanding your specific water needs is crucial. Start by gathering essential tools for water testing and system selection, which will help you choose the most effective filtration approach for your home. Water contaminant testing should be your first priority to determine exactly what type of filtration system will work best.
The selection process involves several key steps. First, obtain a comprehensive water testing kit that can detect various contaminants like sediment, chemicals, heavy metals, and microorganisms. Professional lab testing provides the most accurate results. Based on those findings, you can select an appropriate filtration system matching your specific water quality challenges. Common options include sediment filters, activated carbon filters, reverse osmosis systems, and mixed media filters that combine multiple filtration technologies.
When choosing your filtration system, consider factors like water source, contaminant types, flow rate requirements, maintenance complexity, and budget. Some systems work better for municipal water, while others excel at treating well water or addressing specific issues like high mineral content or chlorine levels. Carefully compare different filter types and their rated performance against your water test results.
To help you compare filtration systems, here’s a summary of common options and their best use cases:
| Filtration Type | Ideal Water Source | Removes | Maintenance Complexity |
|---|---|---|---|
| Sediment Filter | Well or municipal | Dirt, sand, rust | Low |
| Activated Carbon Filter | Municipal | Chlorine, odors, chemicals | Moderate |
| Reverse Osmosis | Any | Heavy metals, bacteria | High |
| Mixed Media Filter | Well or municipal | Multiple contaminants | Moderate to high |
Pro tip: Keep your water testing results on file and retest annually to ensure your filtration system continues meeting your household’s changing water quality needs.
Step 2: Install main filtration unit and connect water lines
Installing your water filtration system requires precision and careful attention to detail. Proper installation ensures clean water flows smoothly through your home’s plumbing. Water filter installation involves multiple critical steps that demand systematic approach and careful connections.
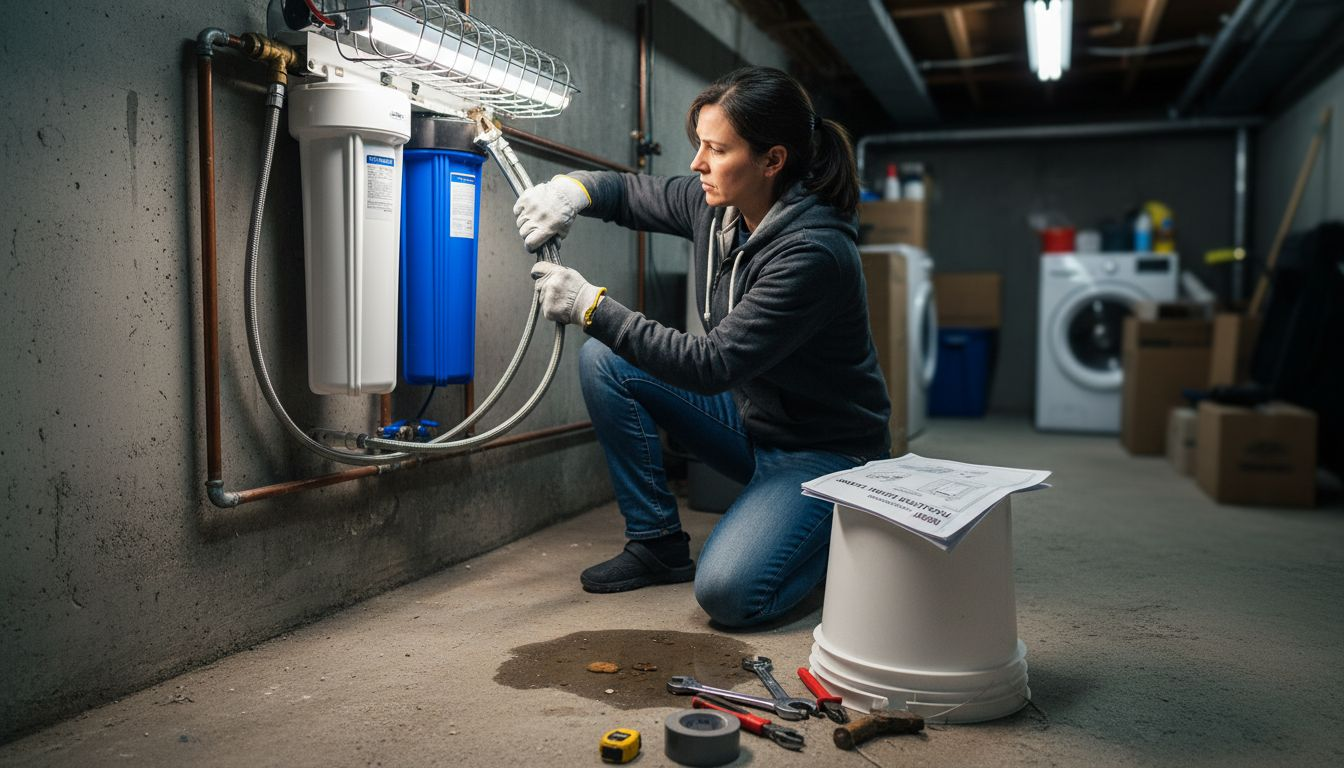
Begin by positioning your main filtration unit near your primary water supply line. Most systems require installation close to the main incoming water pipe to ensure comprehensive water treatment. Carefully shut off your home’s main water valve before starting. Using appropriate wrenches and plumbing connectors, attach the filtration unit’s input and output lines securely. Pay special attention to creating tight seal connections that prevent potential leaks. Some filtration systems might require additional mounting brackets or support structures to ensure stable positioning.
During connection, verify that water flow directions match the arrows printed on your filtration unit. Typically, the input side connects to your home’s incoming water line, while the output side feeds treated water into your household plumbing system. Double check all connections for tightness and potential gaps. If your system includes multiple filtration stages, ensure each component is connected in the correct sequence to maximize water purification effectiveness.
Pro tip: Keep manufacturer installation instructions nearby and consider having a professional plumber verify your connections to guarantee optimal system performance.
Step 3: Attach essential filters and secure housing
Now that your main filtration unit is in place, you will focus on attaching the core components that transform ordinary water into a clean drinking resource. Water filter housing requires careful installation to prevent potential contamination and ensure maximum filtration efficiency.
Start by examining your filter types typically sediment, carbon, and membrane filters. Each filter has a specific housing design that must be securely attached to prevent water bypass. Carefully align the filter with its corresponding housing, ensuring a tight seal. Use rubber gaskets or O rings to create watertight connections. When inserting filters, follow the manufacturer’s recommended orientation markers. Some filters have directional arrows indicating correct water flow direction. Take time to inspect each filter for damage and ensure they are seated correctly within their designated compartments.
Multilayer filtration systems often require strategic placement of different filter media. Arrange filters in sequence starting with sediment filters to remove larger particles, followed by activated carbon filters to eliminate chemicals and improve taste, and finally membrane or specialized filters for final purification. Tighten filter housings using appropriate wrenches but avoid over tightening, which could damage seals or crack plastic components.
Pro tip: Wear clean gloves during filter installation to prevent introducing additional contaminants and keep a clean workspace to maintain filter integrity.
Step 4: Flush system and check for leaks
After installing your water filtration system, flushing and leak detection become critical steps in ensuring proper functionality and water quality. Water system flushing helps remove installation debris, trapped air, and potential contaminants that might compromise your filtration performance.
Begin the flushing process by slowly turning on your main water valve. Allow water to flow through the system at a moderate rate, watching carefully for any signs of leakage around connections, filter housings, and pipe joints. Open multiple faucets in your home to help release trapped air and facilitate a thorough system flush. Watch for steady water flow without sputtering, which could indicate air pockets. Pay special attention to visual inspection points such as transparent filter housings or connection points where water might seep through compromised seals.
Conduct a comprehensive leak check by carefully examining every connection point. Use a dry paper towel or white cloth to detect even minor moisture traces that might indicate small leaks. Run your hand along pipe connections feeling for unexpected moisture. If you discover any leaks, turn off the water supply immediately and tighten connections or replace faulty components. Some minor seepage might require replacing rubber gaskets or repositioning filter housings to achieve a completely watertight seal.
Pro tip: Keep a bucket and towels nearby during initial system flushing to quickly manage any unexpected water discharge or minor leaks.
Step 5: Test water quality and confirm safe operation
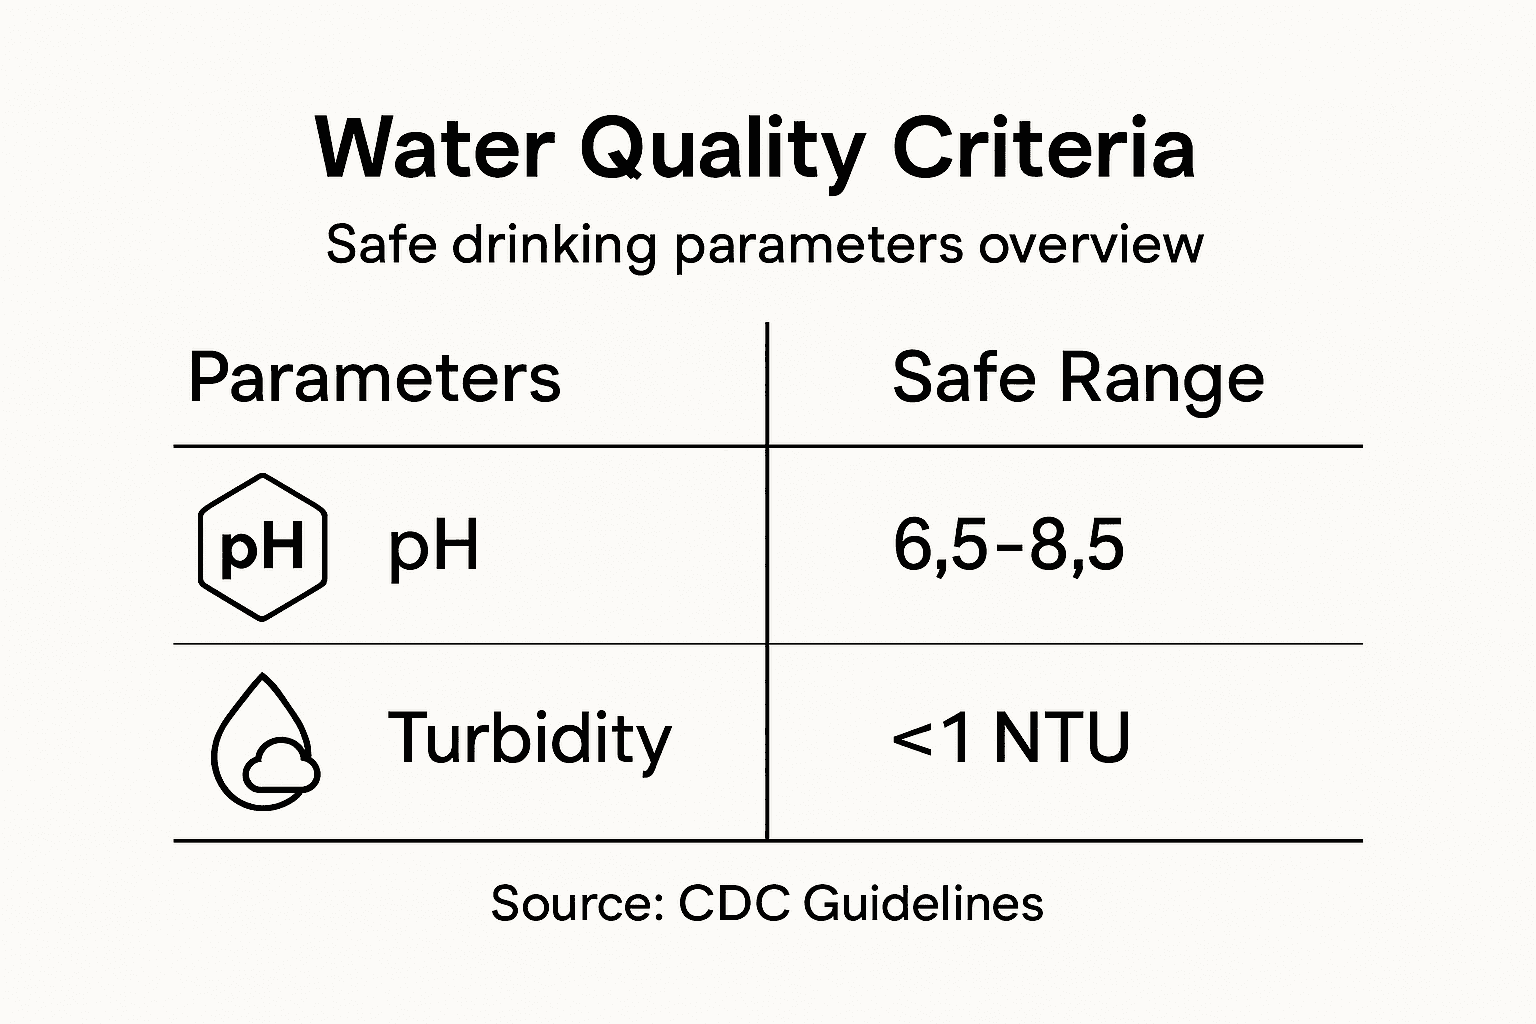
After installing your water filtration system, comprehensive testing becomes essential to validate its performance and ensure your family receives safe drinking water. Water quality testing involves examining multiple parameters that indicate water safety and filtration effectiveness.
Begin by obtaining a professional water testing kit or scheduling a comprehensive analysis from a certified laboratory. These tests will evaluate critical parameters including pH levels, total dissolved solids, bacterial presence, heavy metal concentrations, and potential chemical contaminants. Pay special attention to indicators like coliform bacteria, nitrate levels, and mineral content. Some home testing kits provide immediate results for basic parameters, while more complex assessments require professional laboratory analysis. Compare your results against Environmental Protection Agency standards to determine if your filtration system is performing optimally.
Here is a checklist of key water quality parameters to test after installation:
| Parameter | Safe Range To Achieve | Why It Matters |
|---|---|---|
| pH Level | 6.5 – 8.5 | Maintains safe drinking water |
| Total Dissolved Solids | < 500 mg/L | Indicates filter effectiveness |
| Coliform Bacteria | None detected | Ensures water is microbiologically safe |
| Heavy Metals | Below EPA limits | Prevents health risks |
| Nitrate Level | < 10 mg/L | Protects children and adults |
If test results reveal any concerning contaminant levels, do not panic. Consult with water quality professionals who can help interpret the findings and recommend specific adjustments to your filtration system. This might involve replacing certain filters, adding additional purification stages, or recalibrating your existing setup. Regular testing every six to twelve months will help you monitor your water quality and ensure continued safe drinking water for your household.
Pro tip: Keep a detailed log of your water quality test results to track changes over time and create a comprehensive history of your home water treatment performance.
Ensure Your Home’s Water Safety with Trusted Filtration Solutions
Setting up an effective water filtration system can feel overwhelming with all the testing, installation, and maintenance involved. This article highlights common challenges like selecting the right filters, securing leak-free connections, and verifying water quality after installation. If you want to skip the guesswork and get reliable, scientifically tested water purification for your home, explore proven options designed to tackle contaminants such as heavy metals, bacteria, and chemicals.
Discover Coway’s advanced water purifiers that combine multiple filtration stages with features like UV sanitization for comprehensive protection. You can find everything from compact countertop models to under-sink systems, all engineered for seamless installation and effortless maintenance. Protect your family today with solutions that ensure safe drinking water without the hassle.

Ready to take control of your home’s water quality? Visit Coway Water Purifier’s Uncategorized Archives to explore our range of cutting-edge filtration units. For more details, see the full selection and benefits at https://cowayswaterpurifier.com. Start your journey toward pure water with trusted technology and expert support now.
Frequently Asked Questions
What tools do I need to set up my water filtration system?
To set up your water filtration system, you need a comprehensive water testing kit, wrenches, plumbing connectors, and any specific filters required for your system. Start by gathering these tools to ensure a smooth installation process.
How do I select the right filtration system for my water quality?
Select the right filtration system by first conducting a water test to determine the specific contaminants present. Then, compare the test results with filtration options such as sediment filters, activated carbon filters, or reverse osmosis systems to find the most effective solution for your needs.
What are the steps to install my water filtration system?
Begin installation by positioning your main filtration unit near the primary water supply line, then connect the input and output lines securely. Follow manufacturer instructions for orientation and connection, ensuring all seals are watertight to prevent leaks during operation.
How can I ensure my water filtration system is working correctly?
After installation, you can ensure your system is functioning by flushing it to remove any debris, then checking all connections for leaks. Conduct regular water quality tests every six to twelve months to monitor filtration effectiveness and make adjustments as needed.
What should I do if my water quality test results indicate concerns?
If your test results reveal contaminants above acceptable levels, start by consulting professionals who can interpret your findings. They may recommend replacing certain filters, adding more filtration stages, or adjusting your setup to ensure safe drinking water.
How often should I retest my water quality after setting up the filtration system?
Retest your water quality at least once a year to monitor changes and ensure your filtration system remains effective. Keeping a detailed log of results will help track the performance over time and highlight any necessary adjustments.
Recommended
- How to Install Water Filter: Step-by-Step Home Guide – Coway Water Purifier
- How to Ensure Safe Drinking Water for Home and Business – Coway Water Purifier
- 7 Essential Steps for a Safe Drinking Water Checklist – Coway Water Purifier
- Water Filter Replacement Workflow for Safe Drinking Water – Coway Water Purifier
- Understanding Pet Safe Plumbing Tips For Your Home – Legacy Plumbing & Drain – Emergency Plumbers Of Sacramento