
Uncategorized
Water Filter Replacement Workflow for Safe Drinking Water

Oct
Did you know that the average home’s water filter can reduce over 80 percent of contaminants, but only if it is correctly installed and maintained? Clean water is vital for your health and for the safety of your household appliances. Learning how to replace your water filter properly can prevent leaks, protect your plumbing, and guarantee safe drinking water every single day.
Quick Summary
| Key Point | Explanation |
|---|---|
| 1. Gather all necessary tools | Collect essential tools like wrenches, towels, and gloves before starting the filter replacement to ensure a smooth process. |
| 2. Shut off the water supply | Always turn off the main water supply and relieve system pressure to prevent leaks during removal. |
| 3. Remove old filter carefully | Use consistent counter-clockwise pressure while loosening the old filter to avoid damaging the housing. |
| 4. Install the new filter securely | Ensure the new filter is aligned correctly and tightened without overtightening to prevent leaks. |
| 5. Check for leaks after installation | Inspect all connection points for leaks and flush the new filter to ensure optimal performance before use. |
Table of Contents
- Step 1: Gather Replacement Parts And Necessary Tools
- Step 2: Shut Off Water Supply And Relieve System Pressure
- Step 3: Remove Old Water Filter Safely
- Step 4: Install New Water Filter Securely
- Step 5: Check For Leaks And Verify Water Quality
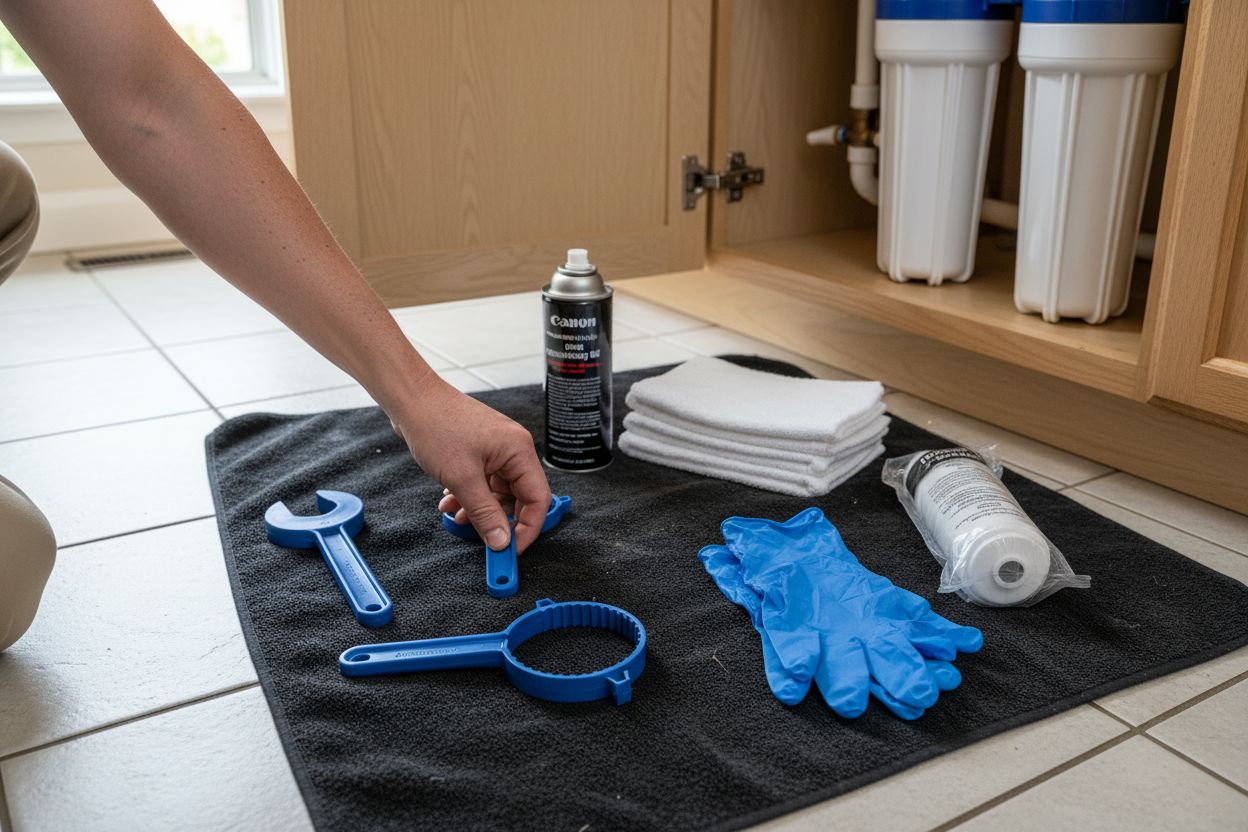
Step 1: Gather Replacement Parts and Necessary Tools
Before diving into your water filter replacement project, you will need to collect all the right equipment and parts to make the process smooth and efficient. This preparation step ensures you are not scrambling midway through the installation and can complete the task safely.
First, start by testing your water quality to determine exactly which replacement filter you need. According to Clean Water Store, matching your filter to specific contaminants is critical. Different filters address unique issues like sediment, chlorine, iron, or bacteria. A quick water test kit from a local hardware store can help you pinpoint the precise filtration needs for your home.
Next, gather your essential tools. As recommended by experts at Pick Comfort, you will want to assemble a comprehensive toolkit that includes:
- Filter housing wrench
- Strap wrench
- Oil filter wrench
- Penetrating oil
- Heating tools
- Clean towels
- Rubber gloves
- A bucket for potential water spillage
Protecting your workspace and having the right tools will make the replacement process much smoother. The rubber gloves and towels are especially important to prevent mess and protect your hands from potential contaminants.
Here’s a comparison of essential tools needed for a smooth water filter replacement:
| Tool | Primary Use | Why It’s Important |
|---|---|---|
| Filter housing wrench | Loosen/tighten filter housing | Prevents over-tightening |
| Strap/Oil filter wrench | Loosen stuck housings | Adds grip, reduces force |
| Penetrating oil | Loosen stubborn threads | Eases removal, prevents damage |
| Heating tools | Loosen stuck parts (if needed) | Helps with aged fittings |
| Clean towels | Clean up water/mess | Maintains a tidy workspace |
| Rubber gloves | Protect hands from contaminants | Enhances safety |
| Bucket | Catch water spills/drips | Prevents water damage |
Pro Tip: Always choose the installation location carefully. Experts recommend placing your water filter after the main water shut-off valve and before the water heater to maximize protection for your home’s appliances and plumbing system.
With your tools and replacement parts ready, you are now prepared to move on to the next step of removing the old water filter housing and installing the new components.
Step 2: Shut Off Water Supply and Relieve System Pressure
Now that you have gathered your tools and replacement parts, it is time to prepare your water system for the filter replacement. This critical step involves safely shutting down the water supply and releasing pressure to prevent unexpected water sprays or potential flooding during the filter removal process.
According to Discount Filters, the correct procedure starts with identifying and shutting off the main water supply or the cold water supply located under your sink. Locate the main water valve typically found near your water meter or in the basement. Turn the valve clockwise until it is completely closed.
Once the main water supply is shut off, you will need to relieve the system pressure. As recommended by Mark Lindsay Plumbing, open a nearby faucet downstream to allow the remaining water to drain. This step helps empty the pipes and reduce potential water pressure.
Pro Tip: When opening the faucet, wait until the water flow slows to a trickle. Then press the filter housing release button to eliminate any additional trapped pressure. This extra precaution prevents unexpected water spray and makes the filter removal much easier.
By carefully following these steps, you create a safe environment for replacing your water filter without risking water damage or unexpected mess. Your system is now prepared for the next stage of the filter replacement process.
Step 3: Remove Old Water Filter Safely
With your water supply safely shut off and system pressure released, you are now ready to remove the old water filter. This step requires careful attention to prevent potential water damage or filter housing damage during removal.
According to Pick Comfort, when removing a water filter that might be stuck, positioning a bucket underneath is crucial to catch any residual water. For most standard filter systems, you will want to apply steady counter-clockwise pressure using a filter wrench or strap wrench. The key is to apply consistent pressure without forcing the housing, which could potentially crack or damage the system.
Once you start loosening the filter, you might notice some remaining water dripping. This is normal. As recommended by Fresh Water Systems, take a clean rag and carefully wipe down the inside of the filter housing to remove any dust or debris that may have accumulated.
Pro Tip: For systems like Everpure, you might need to twist the filter out with a quarter turn. Always refer to your specific manufacturer instructions for the most accurate removal technique.
By following these steps carefully, you will successfully remove the old filter without creating a mess or risking damage to your water filtration system.
Read our guide on water filter types to better understand the nuances of different filtration systems.
With the old filter removed, you are now prepared to inspect the housing and get ready for installing the new water filter cartridge.
Step 4: Install New Water Filter Securely
With the old filter removed, you are now ready to install the new water filter cartridge. This crucial step requires precision and attention to detail to ensure a proper seal and optimal water filtration performance.
According to Fresh Water Systems, the first key step is to align the new cartridge correctly. Look for alignment lugs or directional arrows on the filter that indicate the proper orientation. Carefully insert the filter, making sure it matches the housing precisely. If your filter has O‑rings, consider applying a thin layer of food‑grade silicone grease to ensure a watertight seal.
Discount Filters recommends taking extra care when reconnecting the housing. Tighten the housing or cartridge securely, but be cautious not to over‑tighten threaded components. Using too much force can damage the threads or create a weak seal that might lead to leaks.
Pro Tip: If you are unsure about the exact installation technique, consult your filter manufacturer’s specific instructions. Each system can have slight variations in the installation process.
Learn more about improving your drinking water safety to understand the importance of proper filter installation. By following these steps carefully, you will ensure a secure and effective new water filter that protects your home’s water quality.
With the new filter installed, you are now ready to restore water pressure and test your system.
Step 5: Check for Leaks and Verify Water Quality
With your new water filter installed, the final critical step is verifying its performance and ensuring everything works correctly. This stage involves carefully checking for potential leaks and assessing the water quality that will now flow through your newly replaced filter.
According to Discount Filters, the first action after restoring water supply is to systematically inspect all connection points for potential leaks. Slowly turn on the water and observe each joint and seal closely. Pay special attention to areas around the filter housing where water might potentially seep through.
As recommended by Frizzlife, after confirming no leaks, you should flush the new filter by running water for 3 to 5 minutes. This process helps clear out any air bubbles and loose carbon particles that might be present in the new filter. During this flushing, monitor the water pressure and flow to ensure everything operates smoothly.
Pro Tip: After flushing, perform a quick taste and odor check. Any unusual taste, smell, or significant pressure drop could indicate that the filter needs additional flushing or potential adjustment.
Learn more about the importance of water quality at home to understand why these verification steps are crucial. By meticulously checking for leaks and verifying water quality, you ensure your new water filter provides safe, clean drinking water for your household.
![]()
Congratulations. You have successfully completed your water filter replacement workflow.
Take the Stress Out of Water Filter Replacement—Choose Reliable Purification
You have just learned how important each step of water filter replacement is, from choosing the right filter to preventing water leaks and ensuring the safety of your drinking water. If the thought of ongoing maintenance, potential leaks, or filtering uncertainty makes you worry about your family’s health, you are not alone. Many homeowners want safe, great-tasting water but find filter replacement confusing and time-consuming.
Explore smarter solutions in our latest collection and discover how Coway’s advanced systems remove guesswork from water purification. Our purifiers feature industry-leading filtration technology and hassle-free maintenance, giving you clean water with less effort every day.

Ready to upgrade your water experience? Visit https://cowayswaterpurifier.com to compare the best models for your home. Make the switch now and bring peace of mind to your family’s drinking water. The sooner you start, the sooner you enjoy pure, safe water—right from your tap.
Frequently Asked Questions
How do I choose the right water filter for my home?
To choose the right water filter, first test your water quality to identify specific contaminants. Use a quick water test kit to understand your filtration needs before purchasing a replacement filter.
What tools do I need for a water filter replacement?
You’ll need essential tools like a filter housing wrench, strap wrench, rubber gloves, and clean towels. Gather these items before starting your replacement project to ensure a smooth installation process.
How do I safely shut off the water supply for filter replacement?
To safely shut off the water supply, locate the main water valve and turn it clockwise until it’s closed. This step prevents unexpected water sprays during your filter replacement.
What should I do if my old water filter is stuck during removal?
If your old water filter is stuck, apply steady counter-clockwise pressure using a filter wrench. Position a bucket underneath to catch any residual water and avoid messes during removal.
How can I check for leaks after replacing my water filter?
After restoring the water supply, inspect all connection points for potential leaks. Turn on the water slowly and observe each joint closely for any signs of dripping or leaking.
What steps should I take to flush the new water filter?
To flush a new water filter, run water through it for 3 to 5 minutes after installation. This process helps clear out any air bubbles or loose particles and ensures optimal filtration performance.
Recommended
- 7 Essential Types of Water Filters for Every Home – Coway Water Purifier
- 7 Top Water Filtration Methods You Need to Know – Coway Water Purifier
- 7 Benefits of Water Filtration for Your Home and Health – Coway Water Purifier
- Improve Drinking Water Safety: Essential Steps for Families – Coway Water Purifier